Publish an Azure RM Web App using a Service Principal in PowerShell
Deploying an Azure Web App is almost stupidly simple. If I were to list the methods and tools I’d still be typing next week. The problem with many of these tools and process is that they do a whole lot of magic under the hood which makes the process difficult to manage in source control.
I’m a big believer that all code (including deployment code) should be in the application source repository so it can be run by any tool or release pipeline - including manually by development teams. This ensures that whatever deployment process is used, it is the same no matter who or what runs it - and we end up continuously testing the deployment code and process.
So I decided to go and find out how to deploy an Azure Web App using PowerShell using an Service Principal.
If you look through the Azure PowerShell cmdlets you’ll find a service manager one called Publish-AzureWebsiteProject. This cmdlet looks like it should do the trick, but it isn’t suitable because it requires authentication by a user account instead of a service principal.
Only service principal accounts can be authenticated using automation. Therefore using Publish-AzureWebsiteProject would only work if a development team member was able to interactively login- which would prevent the same process being used for automation or our continuous delivery pipeline. The newer Azure Resource Manager cmdlets (*-AzureRM*) all support a login using a service principal, but the problem is that there is no Publish-AzureRMWebsiteProject cmdlet.
So, to work around this limitation I determined I had to use Web Deploy/MSDeploy. The purpose of this post is to share the PowerShell function/code and process I used to do this. This will work with and without Web App deployment slots.
Note: in my case our teams put all deployment code into a PowerShell PSake task in the application source code repository to make it trivial for anyone to run the deployment. The continuous delivery pipeline was also able to call the exact same task to perform the deployment. There is no requirement to use PowerShell PSake - just a simple PowerShell script will do.
So, I’ll start by just pasting the function that does performs the task:
Just save this file as Publish-AzureRMWebappProject.ps1 and you’re ready to start publishing (almost).
Before you can use this function you’ll need to get a few things sorted:
- Create a Service Principal with a password to use to deploy the web app using the instructions on this page.
- Make sure you have got the latest version of the Azure PowerShell Modules installed (I used v4.0.0). See this page for instructions.
- Make sure you’ve got MSDeploy.exe installed on your computer - see this page for instructions. You can pass the path to MSDeploy.exe into the Publish-AzureRMWebappProject.ps1 using the MSDeployPath parameter.
- Gather the following things (there are many ways of doing that - but I’ll leave it up to you to figure out what works for you):
- the Subscription Id of the subscription you’ll be deploying to.
- the Tenant Id of the Azure Active Directory containing your Service Principal.
- the Application Id that was displayed to you when you created the Service Principal.
- the Password you assigned when you created the Service Principal.
Once you have got all this information you can call the script above like this:
Note: You’ll need to make sure to replace the variables $SubscriptionId, $TenantId, $Password and $Username with the values for your Azure Subscription, Tenancy and Service Principal.
When everything is done correctly this is what happens when you run it (with -Verbose enabled):
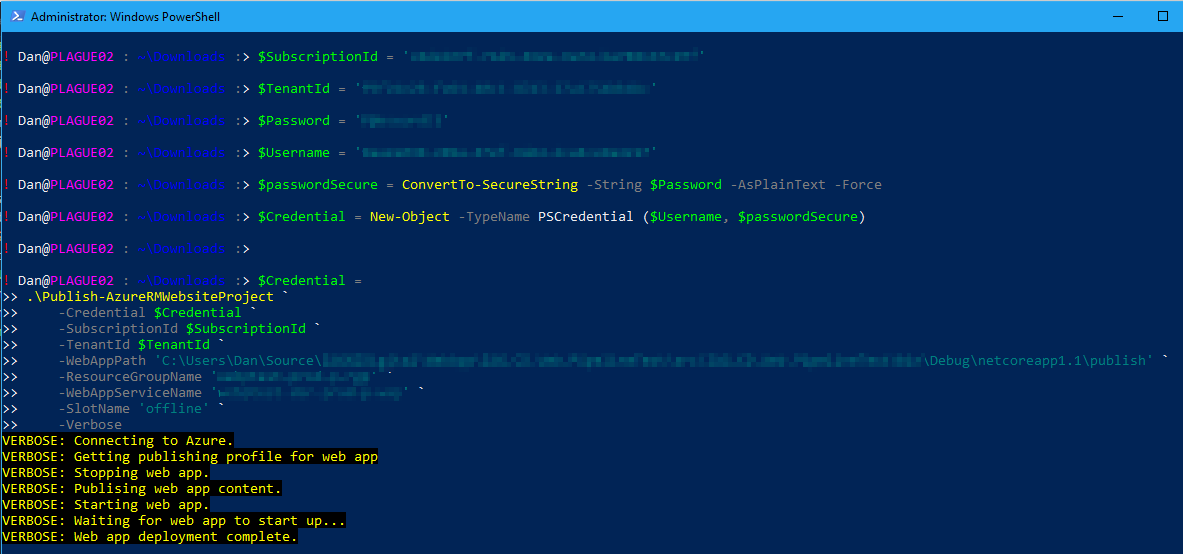
Note: in the case above I was installing to a deployment staging slot called offline, so the new version of my website wouldn’t have been visible in my production slot until I called the Swap-AzureRmWebAppSlot cmdlet to swap the offline slot with my production slot.
All in all, this is fairly robust and allows our development teams and our automation and continuous delivery pipeline to all use the exact same deployment code which reduces deployment failures.
If you’re interested in more details about the code/process, please feel free to ask questions.
Thanks for reading.