
Enabling GitHub Copilot Coding Agents to Access Azure
Before I start with the details, I want to make something extremely clear: Do not give coding agents access to production. We’ve all read/seen the stories on the internet about AI’s potential for causing chaos if not properly controlled. This is not specific to AI, but it’s a general rule: Don’t give developers/anyone permanent, ungoverned access to production resources without strict controls in place. I could spend the rest of this blog post lecturing about this, but then we’d never actually get to the point of this article. So warnings aside, lets get to it.
Background
I’ve been experimenting with GitHub Copilot coding agents, assigning them tasks almost every day (and night) and they’re pretty impressive. But on occasion I actually need coding agents to interact with Azure resources, usually as part of diagnosing an issue/fixing a bug that requires real-time access to those resources (only in dev/test, of course). This is also sometimes useful if I want the coding agent to be able to verify some infrastructure it’s creating Bicep or Terraform files for.
So, this blog post shows you how to configure your coding agents to be able to use a federated identity to access Azure resources securely, without needing to store any secrets in your repository. As well as set up RBAC permissions so that they only get the level of access they need.
Why This Matters
Here’s what I can do now with my Copilot agents:
- Diagnose issues that might be occurring in dev/test environments
- Access key vault secrets that might be required to access dev/test databases or other resources
- Validate or obtain specific information about the Azure environment that is being worked with
- Automatically provision (and of course cleanup) Azure resources as part of coding agent development process. But remember, deploying resources in Azure usually has a cost associated with it.
- Enable your Coding Agents to use the Azure MCP Server.
The most important thing to note however, is the principle of least privilege: If your coding agent doesn’t need access to Azure, don’t provide it access. If just needs to be able to read diagnostic logs from a Log Analytics workspace, then that’s all it should be allowed to do. It’s very easy to over-provision access, so always err on the side of caution.
Azure Costs
If you give coding agents permission to deploy resources, be aware of the potential costs involved. Because coding agents now read the copilot-instructions.md in your repository, it will be critical to provide cost management guidance within that file - including the fact that they should delete any resources they create once they are done with them.
My advice is to avoid giving them write/deploy access unless absolutely necessary, or at the very least have a method of tracking and auditing their resource usage. It would be quite simple to create a janitor (a GitHub Actions workflow) that deletes any resources that were created in a resource group that the Coding Agent has permission to create in.
Getting the Security Right
Before we dive into the setup, let me be clear about the security principles I follow. I’ve seen too many “quick demos” that skip these fundamentals:
- Least privilege always: Give only the minimum permissions needed. You can expand later.
- Federated credentials only: Workload identity federation is the right way to give your coding agents access to Azure.
- Environment isolation: Dev/test, staging need separate identities. But I shouldn’t have to repeat: don’t give coding agents access to production.
- Check what your agents are doing: You need to know what your agents are doing in Azure.
- Your agent, your cost: Coding agents don’t care about your budget (unless you tell them to and what to do about it).
These aren’t optional “best practices”—they’re requirements if you want to sleep well at night.
How to Set This Up
The process is as follows:
- Create a GitHub environment called
copilotfor your coding agent to use in the GitHub repository. - Create an Entra ID app registration for your coding agent.
- Create a federated credential for the app registration that is usable by the coding actions GitHub workflow.
- Assign the least access RBAC roles to the app registration that coding agent will need.
- Create the secrets and variables for the
copilotenvironment in the GitHub repository. - Configure or create the
copilot-setup-steps.ymlworkflow to use the credential to authenticate to Azure.
The next sections show the process in detail.
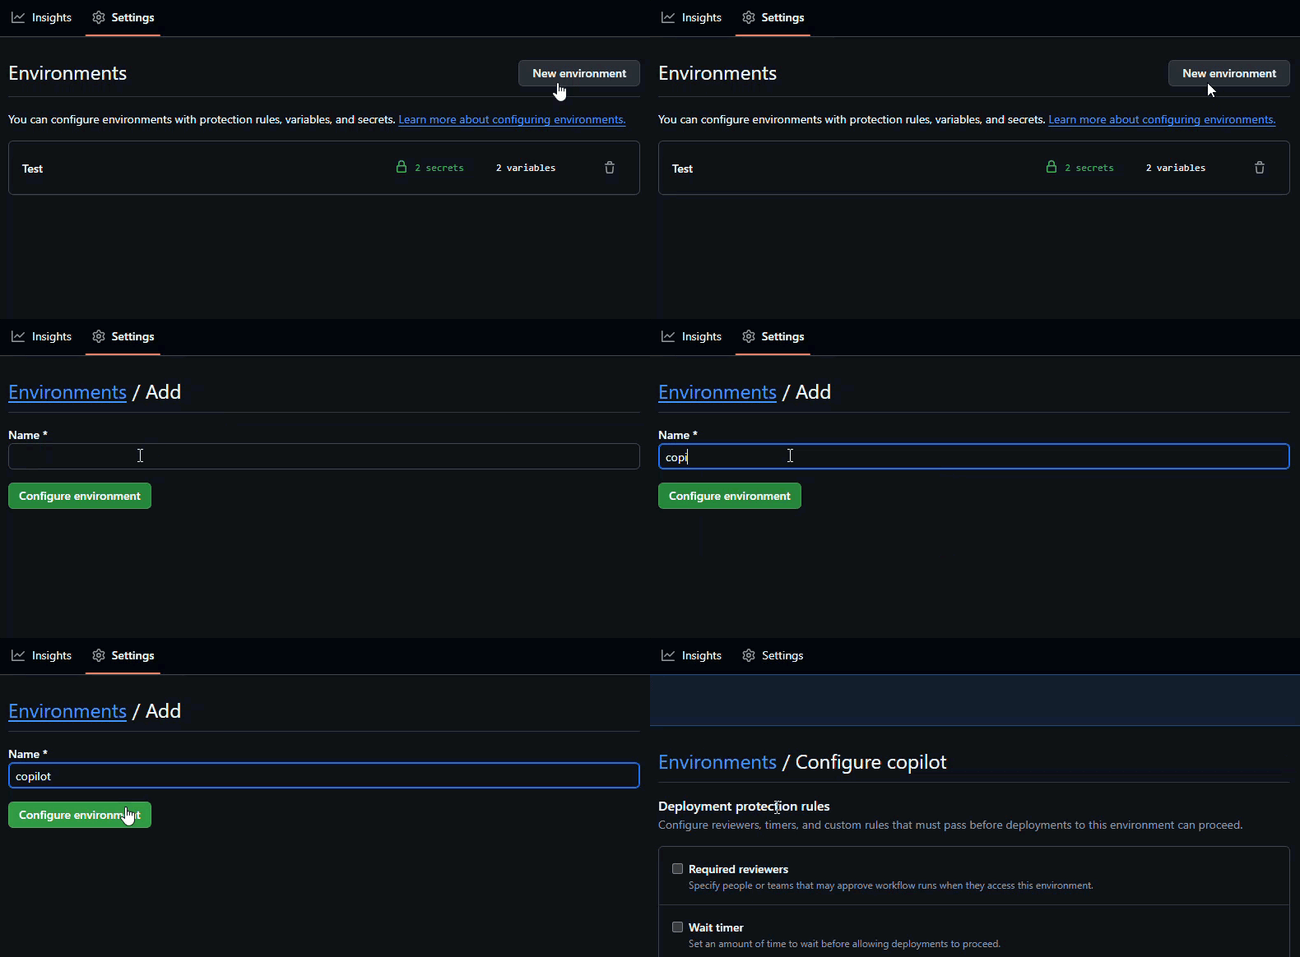
1. Create a GitHub Environment
It is best to create an environment in GitHub that your coding agent has access to. This allows you to provide environment specific variables and secrets that your coding agent will get access to. This is required for the federated credentials to work.
I have called my environment
copilot, but you can name yours anything you like. Make sure to adjust any steps accordingly.
- Go to your GitHub repository
- Click on Settings
- Scroll down to the Environments section
- Click New environment
- Name it something like
copilot - Click Configure environment
2. Create the Entra ID App Registration
Next, you need an Entra ID application registration for your coding agents to use. You should create a dedicated app registration for each repository so that you can scope the permissions for each coding agent to prevent over-privileging.
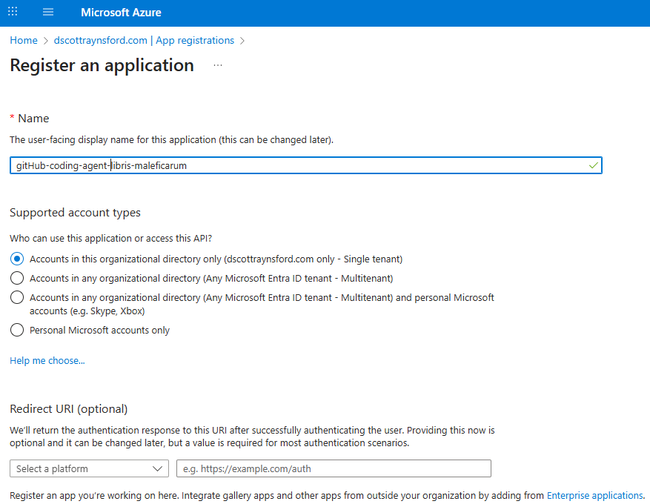
- Head to the Azure Portal
- Navigate to Microsoft Entra ID (using the Azure search box)
- Select the App registrations blade under Manage
- Click New registration
- Name it something meaningful like
gitHub-coding-agent-yourreponame - Leave the Redirect URI blank and the Supported Account Types as
Accounts in this organizational directory only - Click Register
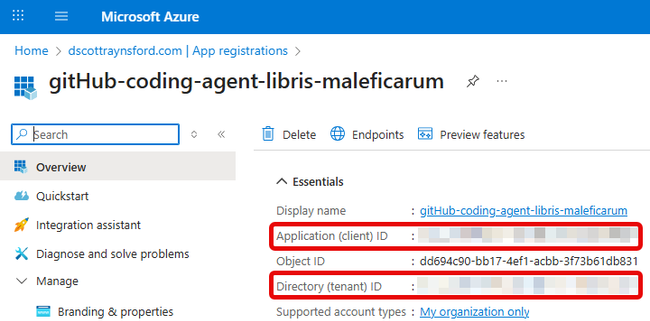
Once it’s created, grab these values from the Overview page:
- Application (client) ID - You’ll need this for GitHub secrets
- Directory (tenant) ID - Also required for GitHub secrets
# Example values (yours will be different)
AZURE_CLIENT_ID="12345678-1234-1234-1234-123456789012"
AZURE_TENANT_ID="87654321-4321-4321-4321-210987654321"
3. Create a Federated Credential
This is where the magic happens. Federated credentials create a trust relationship between GitHub and Azure without storing any secrets. It’s way more secure than cramming service principal secrets into your repo.
Here’s the crucial part that tripped me up initially:
- In your app registration, go to Certificates & secrets
- Click the Federated credentials tab
- Click Add credential
- Select GitHub Actions deploying Azure resources
- Fill in the details:
- Organization: Your GitHub username or organization
- Repository: Your repository name
- Entity type: Environment
- Environment name:
copilot(this is crucial. It must match exactly the name of the GitHub environment you created) - Name: Something descriptive like
gitHub-coding-agent-yourreponame-copilot-environment
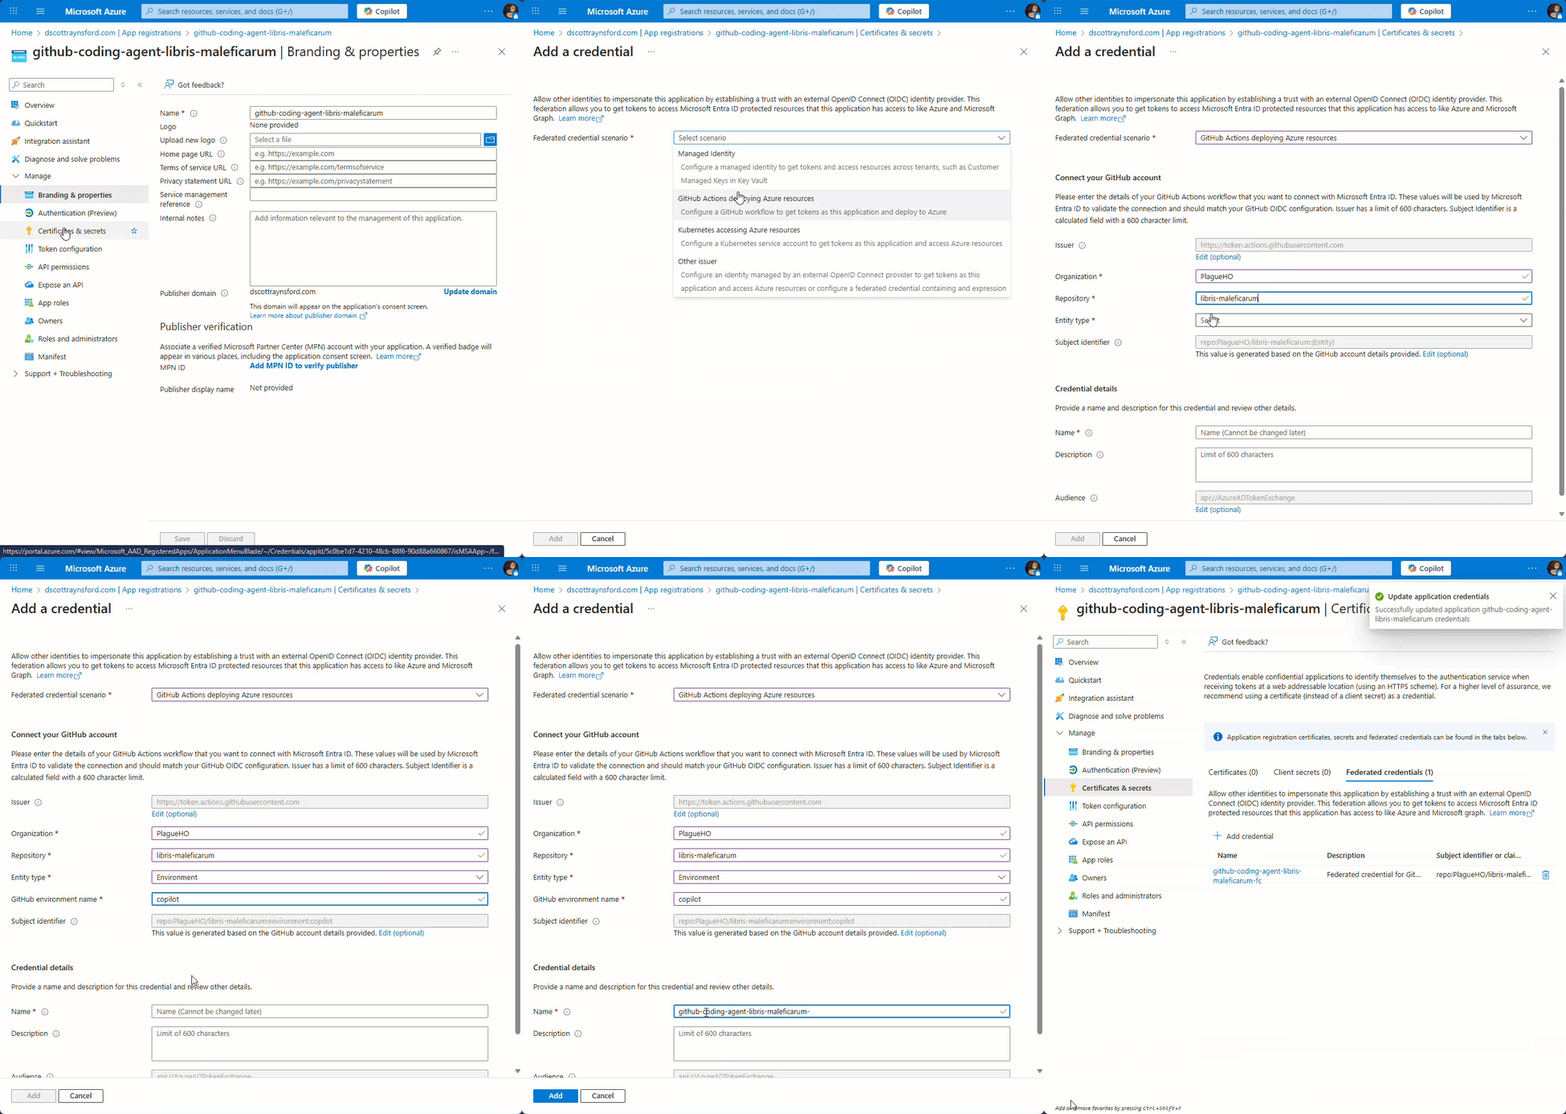
The environment name must be exactly
copilotwith lowercase ‘c’. I learned this the hard way when I kept getting AADSTS7002138 errors. Azure federated identity credentials are case-sensitive, soCopilotorCOPILOTwill fail.
4. Set Up Azure RBAC Roles
Now for the permissions. The specific roles depend on what your agents need to do, but always start with minimal permissions and expand as needed. Just remember the golden rule:

You can grant the RBAC roles through the Azure Portal just as you would any other application registration, user, group or managed identity, but below, I’m using Azure CLI, so have already logged into Azure using az login. Just use the method you’re most comfortable with. The following are some examples of RBAC roles you might wish to give your coding agent.
To allow the coding agent to experiment in a single group for resource deployment and management:
# Set environment variables
export AZURE_CLIENT_ID="12345678-1234-1234-1234-123456789012"
export AZURE_SUBSCRIPTION_ID="11111111-2222-3333-4444-555555555555"

# Create a resource group for the coding agent
az group create --name rg-coding-agent-sandbox --location eastus

# Contributor role to a single existing resource group
az role assignment create \
  --assignee $AZURE_CLIENT_ID \
  --role "Contributor" \
  --scope "/subscriptions/$AZURE_SUBSCRIPTION_ID/resourceGroups/rg-coding-agent-sandbox"
For read-only monitoring of a subscription:
# Set environment variables
export AZURE_CLIENT_ID="12345678-1234-1234-1234-123456789012"
export AZURE_SUBSCRIPTION_ID="11111111-2222-3333-4444-555555555555"

# Reader role for subscription
az role assignment create \
  --assignee $AZURE_CLIENT_ID \
  --role "Reader" \
  --scope "/subscriptions/$AZURE_SUBSCRIPTION_ID"
For Key Vault access:
export AZURE_CLIENT_ID="12345678-1234-1234-1234-123456789012"
export AZURE_SUBSCRIPTION_ID="11111111-2222-3333-4444-555555555555"
export RESOURCE_GROUP_NAME="your-resource-group-name"
export KEY_VAULT_NAME="your-keyvault-name"

# Key Vault Secrets User
az role assignment create \
  --assignee $AZURE_CLIENT_ID \
  --role "Key Vault Secrets User" \
  --scope "/subscriptions/$AZURE_SUBSCRIPTION_ID/resourceGroups/$RESOURCE_GROUP_NAME/providers/Microsoft.KeyVault/vaults/$KEY_VAULT_NAME"
I can’t stress this enough: Principle of least privilege. I’ve seen too many demos where people just hand out Contributor at the subscription level. That’s asking for trouble.
5. Add GitHub Repository Secrets
Your Copilot agents need three pieces of info to authenticate with Azure. Store these as GitHub repository environment level secrets—not environment variables in your code.
- In your GitHub repository, go to Settings
- Select Environments
- Click on your
copilotenvironment - Click Add environment secret
- Add these repository secrets, one-by-one:
AZURE_CLIENT_ID: 12345678-1234-1234-1234-123456789012
AZURE_TENANT_ID: 87654321-4321-4321-4321-210987654321
AZURE_SUBSCRIPTION_ID: 11111111-2222-3333-4444-555555555555
If you’re not sure how to get your Azure Subscription ID, this page will tell you how.
These aren’t really “secrets” since they’re identifiers, but storing them as repository secrets keeps your config centralized and secure and it is better to treat them as secrets.
6. Create the GitHub Actions Workflow
Here’s where it all comes together. GitHub Copilot coding agents always look for a workflow called .github/workflows/copilot-setup-steps.yml in the GitHub repository that they are working on. This is actually a GitHub Actions workflow that provides all the necessary steps to set up the environment that the coding agent will work in. In our case, this also authenticates to Azure.
Create .github/workflows/copilot-setup-steps.yml:
name: Copilot Setup Steps

on:
  workflow_dispatch:

permissions:
  id-token: write
  contents: read

jobs:
  copilot-setup-steps:
    runs-on: ubuntu-latest
    permissions:
      id-token: write
      contents: read
    environment: copilot  # This must match your federated credential environment name

    steps:
      - name: Checkout repository
        uses: actions/checkout@v4

      - name: Azure login
        uses: azure/login@v2
        with:
          client-id: ${{ secrets.AZURE_CLIENT_ID }}
          tenant-id: ${{ secrets.AZURE_TENANT_ID }}
          subscription-id: ${{ secrets.AZURE_SUBSCRIPTION_ID }}

      - name: Verify Azure access
        run: |
          echo "Successfully authenticated to Azure!"
          az account show
This workflow provides a solid foundation that your Copilot agents can build on for various Azure tasks that might need to perform while working on an issue. The key is the environment: copilot line—that’s what ties everything together with your federated credential.
Test It Out
Time to see if everything works. Let’s test the authentication flow:
- Go to your GitHub repository
- Click Actions → Copilot Setup Steps
- Click Run workflow
- Select the
mainbranch - Click Run workflow
If everything’s configured correctly, you should see:

When things go wrong (and they will):
Error: AADSTS7002138: No matching federated identity record found
- Verify the environment name is exactly
copilot(lowercase) - Check that your repository and organization names match exactly
- Ensure the federated credential subject pattern is correct
Error: AADSTS70021: No matching federated identity record found for presented assertion
- Verify your GitHub repository secrets are correct
- Check that the app registration client ID matches
- Ensure the federated credential is properly configured
Error: Authorization failed
- Verify RBAC role assignments are correct
- Check that permissions are assigned to the correct scope
- Ensure the service principal has the necessary roles
Beyond the Basics
Configuring Coding Agents to use Azure MCP
To enable your coding agents to use an Azure MCP (Model Context Protocol) server, you’ll need to first add the Azure MCP in the Copilot settings for the repository. For more information on the Azure MCP server, see this page. The Azure MCP server actually makes calls to Azure CLI commands which is why it can only function if the coding agent environment is already connected to Azure.
- Open the Settings tab of your GitHub repository.
- Expand the Copilot section.
- Select Coding agent.
- In the MCP configuration section add:
 {
   "mcpServers": {
     "Azure": {
      "type": "local",
      "command": "npx",
      "args": [
        "-y",
        "@azure/mcp@latest",
        "server",
        "start"
       ],
      "tools": ["*"]
     }
   }
}- Click Save MCP configuration.
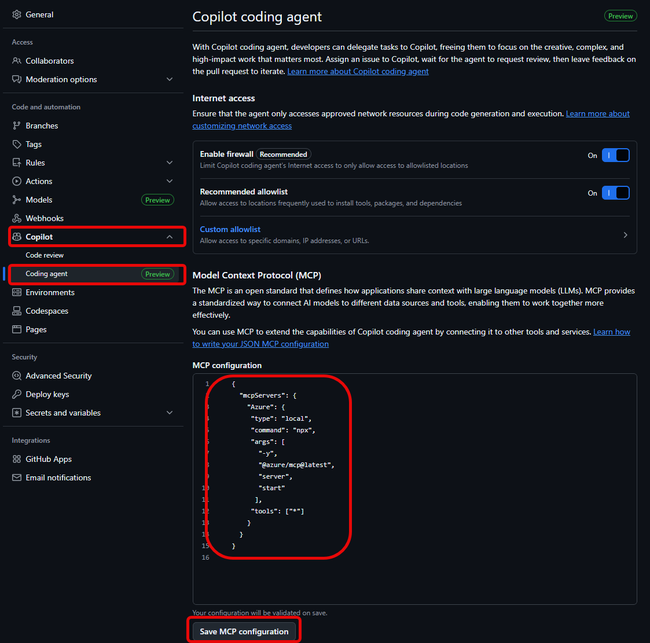
A reminder: the Azure MCP server can only function if the coding agent environment is already connected to Azure. It uses the application registration provided in the GitHub repository secrets and will only have permissions to do what that identity can do. So make sure your permissions are set up correctly!
Testing with the Coding Agent
To really test out the setup, we need to have the coding agent perform a task that requires it to access Azure and use the Azure MCP server. If you don’t have the Azure MCP server configured, the coding agent won’t have the MCP tools to access to Azure, but technically can still call Azure CLI commands directly.
- Open your GitHub repository.
- Go to the Issues tab.
- Click New issue.
- Set the title to “Add Resource Group List” with a description that says:
Add a list of all the Azure Resource Groups in the subscription into a Markdown file called `resourcegroups.md`. Use the `#groups` tool if it is available, otherwise, run the `az` command.- Click the Assignee button and select
Copilot - Assign the issue to the Copilot coding agent.
- Click the Create button.
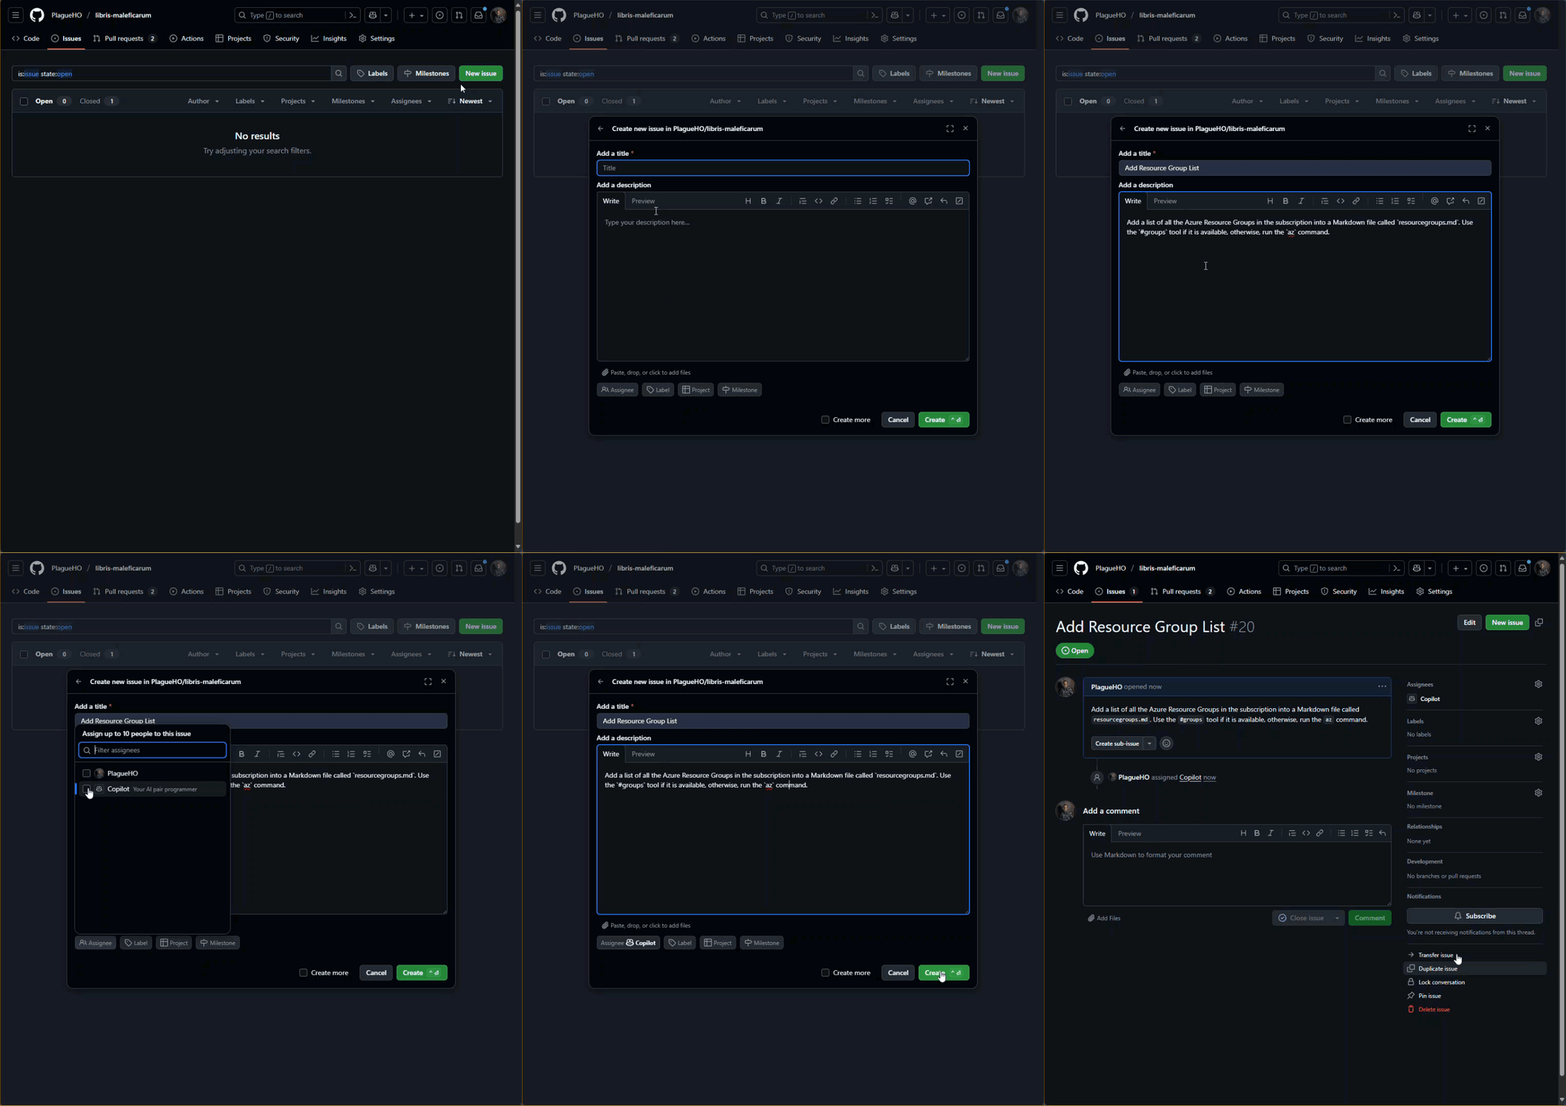
- After a few seconds Copilot will create a new branch and a draft pull request and assign the coding agent to get to work.
- You can watch the progress by selecting the new pull request and clicking the View Session button.
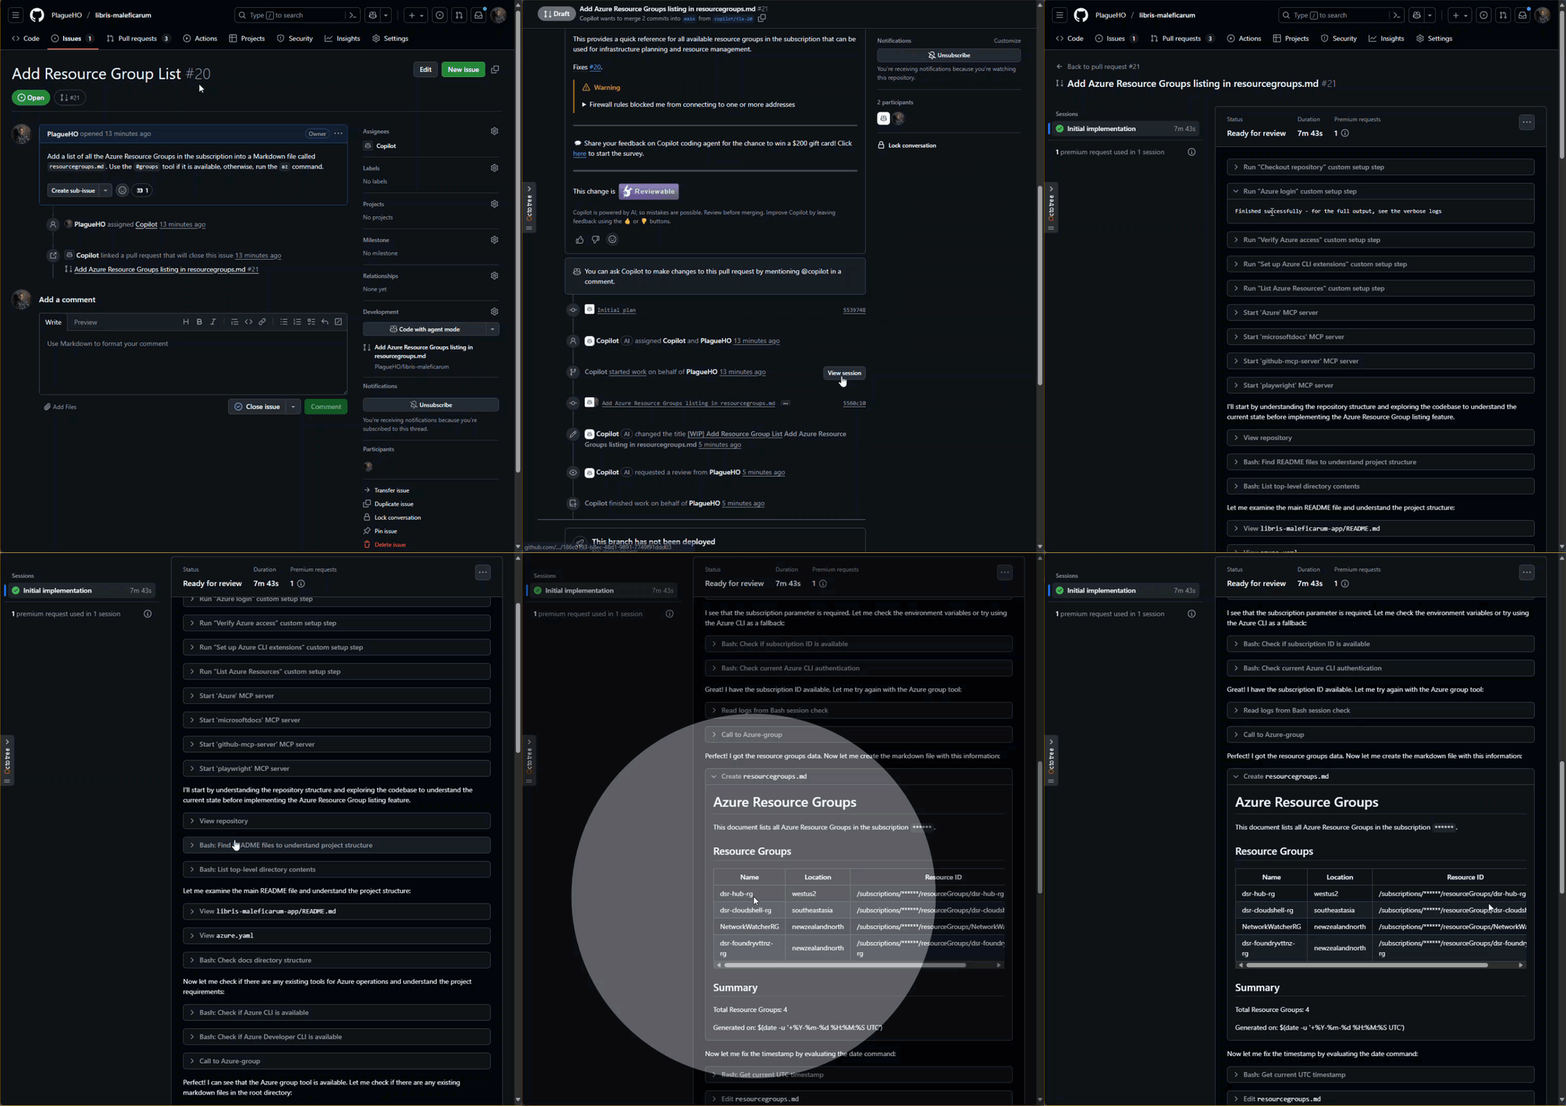
This is obviously a simplified example, and a very wasteful way to create this issue, but it demonstrates the potential for using GitHub Copilot coding agents to interact with Azure resources as part of a coding workflow.
Conclusion
Setting up GitHub Copilot coding agents with secure Azure access opens up options for coding agents to do more than just code. They can now interact with Azure resources, diagnose issues, and even automate infrastructure management tasks—all while adhering to security best practices.
The federated credential approach follows enterprise security best practices while actually being easier to set up than the old “secrets everywhere” approach.
What’s Next
Ready to expand this? Consider:
- Limit coding agents to just reader over dev/test environments unless you have effective controls in place (cost, auditability)
- Using copilot-instructions to tell coding agents when and why to use Azure MCP tools. See custom instructions. This should include specific scenarios where Azure MCP tools are beneficial, as well as any relevant context or constraints and requirements to delete deployed resources.
Remember: the goal isn’t to replace human oversight—it’s to allow your coding agents to be able to make better code descisions or provide better debugging assistance by having access to the Azure resources they need, when they need them.
And one last time:

